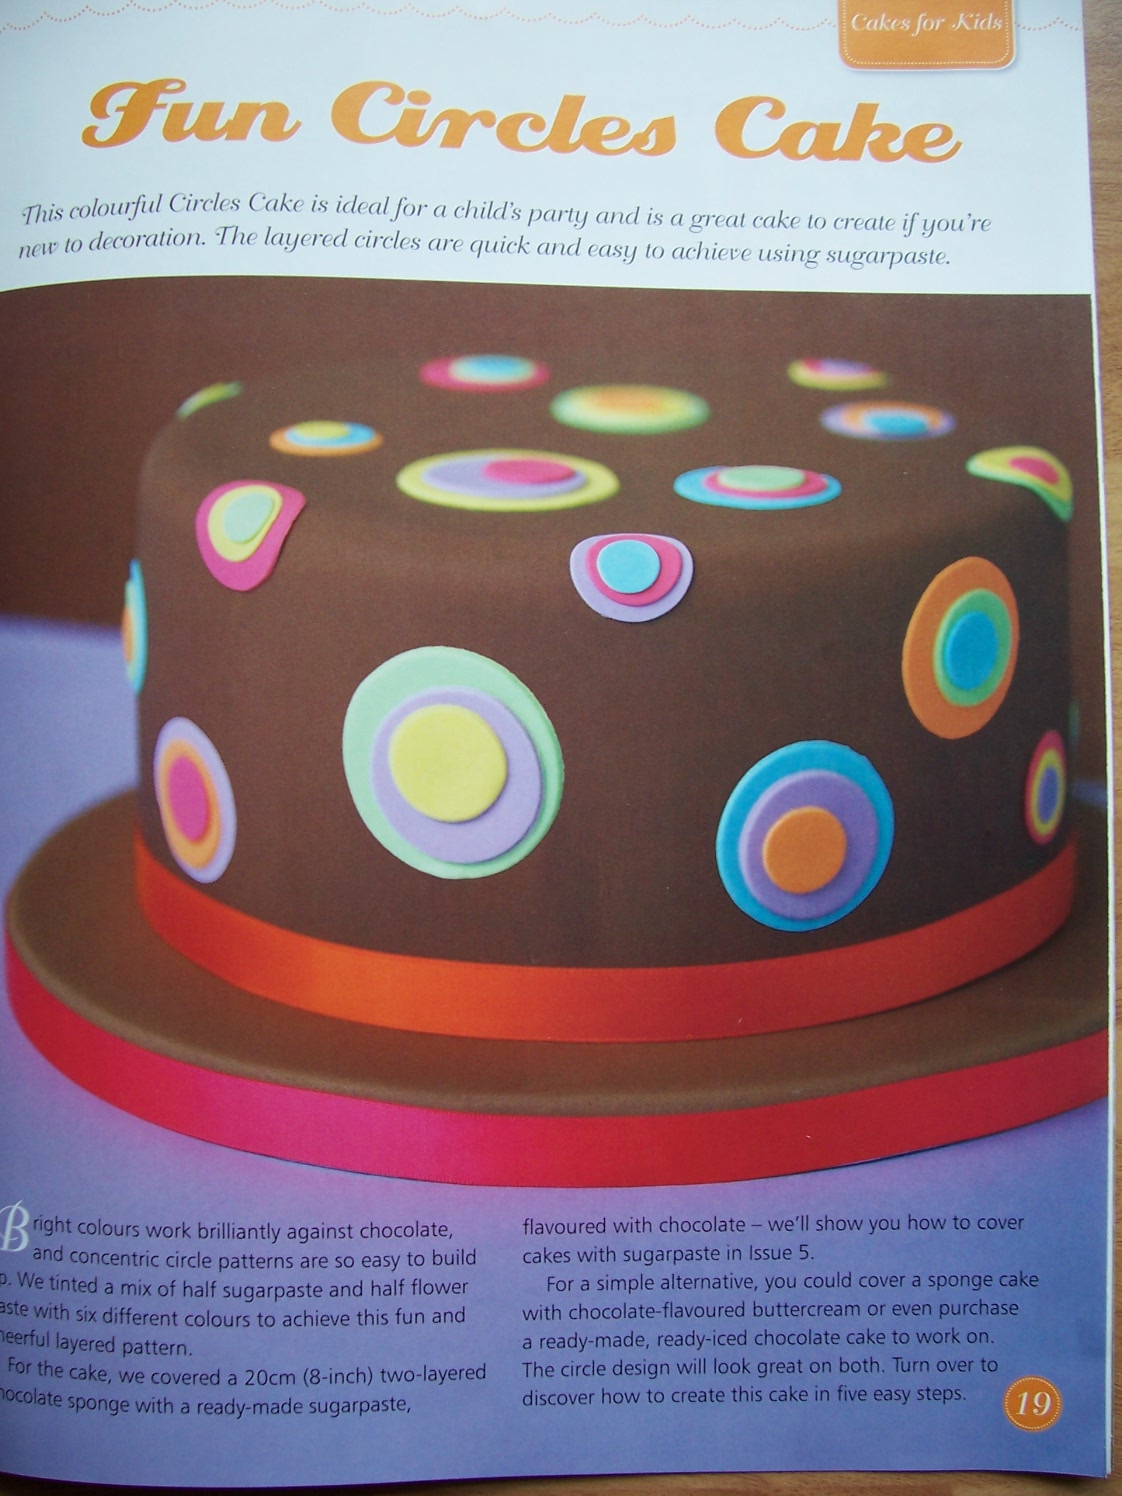
Fun Circles Cake

Every January the advertisements for the periodicals start, they're on all matter of subjects, from the vehicles that starred in the James Bonds films to patchwork quilting, and for the most part they hold no attraction for me, but this year turned up a real treat. Cake Decorating caught my eye, it was on the magazine shelf while I was out shopping and I was immediatly sold, locally we have no baking supplies shop so this offered me access to good quality cutters etc. The first issue had this cake on the cover (as well as a butterfly metal cutters, pink glitter and a cupcake stand, woo hoo!!) I was in heaven, I spent the whole afternoon pouring over it's bright photographs and step-by-step instructions (very much my kind of thing!!). This met all my needs, sugar crafting equipment and the know how all in one.
 I was (briefly) considering doing a sugar craft night course, but the thoughts of venturing out on cold winter nights for three long months gave me pause for thought, I'm not going not going in to the cake decorating business, this is just a hobby, why the effort. Now in the comfort of my own home and at my own pace I can turn out cakes that I for one am proud of. This cake tutorial starts with a 20cm Iced Chocolate Cake, so I am responsible for anything prior to that point in this post. Enjoy
Recipe inspired by Cake Decorating Issue 1(2012)
Serves 8-10
Ingredients
My Celebration cake
Chocolate buttercream
500g Golden marzipan
25g Cocoa powder
50g White sugar paste
50g White flower paste
6 Food colours, lemon yellow, ruby red, orange, green, ice blue, purple
25g Royal icing
Method
As we have no sugar craft shop locally to purchase chocolate sugarpaste I decided to use golden marzipan which I then kneaded with cocoa until the marzipan was a dark brown colour.

The best way to check if you have kneaded any colour in correctly is to cut it in half and check.

I then covered my (scratched) cake board with the cocoa marzipan. Roll out about a third of the cocoa marzipan into a round large enough to cover your whole board, brush the board with water and gently lay the marzipan over it, smooth with a cake smoother from the centre outwards and trim with a sharp knife.

This is best done the day before so the board drys completely, otherwise all fingerprints will show up on your finished cake board.

"Stick" your chocolate sponge to the board with a large dab of buttercream and then proceed to fill and cover the whole cake with a crumbcoat of buttercream.

Leave the buttercream to set in the fridge while you roll out the cocoa marzipan.

Cover the cake and smooth from the centre outwards, brush away any stray cocoa powder with a dry pastry brush. If you are new to covering a cake with sugarpaste then I suggest you read this post for more step-by-step photographs Ladybird Birthday Cake.

I secured a red ribbon with some royal icing. The cake in the magazine has some extra height over mine because they're cake is on a 20cm drum cakeboard which is then covered with buttercream and sugarpaste which is then layed on an additional covered drum board.

Make a 50:50 mix of sugarpaste and flowerpaste by kneading it together, then divide it into six equal parts. Knead colour into each one and roll out your first ball of paste to around 1mm thick. using circle cutters in three or four different sizes, cut out several circles from each ball. To help your circles stick to the cake, dot the backs of each one with a small smear of stiff-peal royal icing or a day of buttercream (if you covered the cake with chocolate buttercream)

Randomly place your large circles on the cake and hold each one in position for a few seconds- particularly the circles on the sides. If you're adding a circle that folds over the edge of the cake, gently smooth it down. Don't use too much pressure or you'll stretch it.

Layer on your second and third circles in the same way. Try to vary the colours between your circles as much a possible and layer slightly off centre to make your design look random and fun.


Expert Tip:
You can use only sugarpaste but by mixing it with flower paste you'll be able to roll thinner circles and get a better finish. (I only used sugarpaste, note the thicker circles!)
Try This:
Circles make fun cupcake toppers, too. Build up a mini concentric circle design using just two or three layers of circles, let it dry out (very important!!) and place it on top of piped icing. (I couldn't resist)


Comments
Post a Comment