Mary Berry's Black Forest Gâteau
So you know how it is, it's a dreary Wednesday afternoon, it's drizzling and a bit chilly so you decide that the very thing to cheer you would be a large slice of cake....even better a large slice of homemade cake!
Just me then? Oh well that's how it happened, I was on Instagram chatting as you do and I spied this beautiful cake and upon further investigation my friend told me that it was Mary Berry's recipe. That's all I needed to hear!
So a little background information, I had been on the lookout for a recipes that required cherries because there was a bag of frozen cherries languishing at the bottom of my chest freezer waiting for the day when I would actually use them (were originally bought for a smoothies but that didn't pan out) so here was my moment and what better and recipe that I knew was going to work out perfectly. I have made some small changes but you're free to check out the original recipe in the link below.
Recipe inspired by Mary Berry's Black Forest Gâteau from the GBBO
Serves 6-8
Ingredients
6 Large eggs
150 -175g Caster sugar
100g self raising flour
50g Cocoa powder (not drinking chocolate)
500g Frozen cherries (I used Aldi Dark Sweet Cherries)
2tbsp Cornflour
1-2tbsp Caster sugar
1-2 tbsp Kirsch or Brandy (optional)
500-600ml Whipping cream
Dark chocolate for decorating
Method
Preheat the oven to 180C/160C Fan/Gas Mark 4 and line two 8inch (23cm) baking pans with baking paper. Place the eggs and sugar into a large mixing bowl and whisk until it has increased in volume and is both pale and creamy. It's ready when you can trail the whisk over the mixture and it leaves a ribbon across the surface. Combine the flour and cocoa powder together and then carefully add that mixture to the bowl and fold, trying not to knock out all that precious air you've just whipped into the egg and sugar mixture.
Divide the batter between the two prepared cake pans and bake in the centre of the preheated oven for 25-30 minutes or until a skewer comes out clean. set aside until completely cool.
Meanwhile add the cherries to a medium sized saucepan. In a tea cup add the cornflour, caster sugar and Kirsch/Brandy (if using) or 2 tbsp of cold water and stir until vigorously until combined, pour this magic concoction over the cherries in the saucepan and stir over a medium heat until the cherries are bubbling and beginning to give up their juices. Once the cherries are defrosted and the sauce is beginning to thicken, remove from the heat. Pour into a small bowl and chill until almost set.
While the cherries are setting in the fridge and the sponges are cooling whip the cream until almost stiff peaks, set aside.
Assembly:
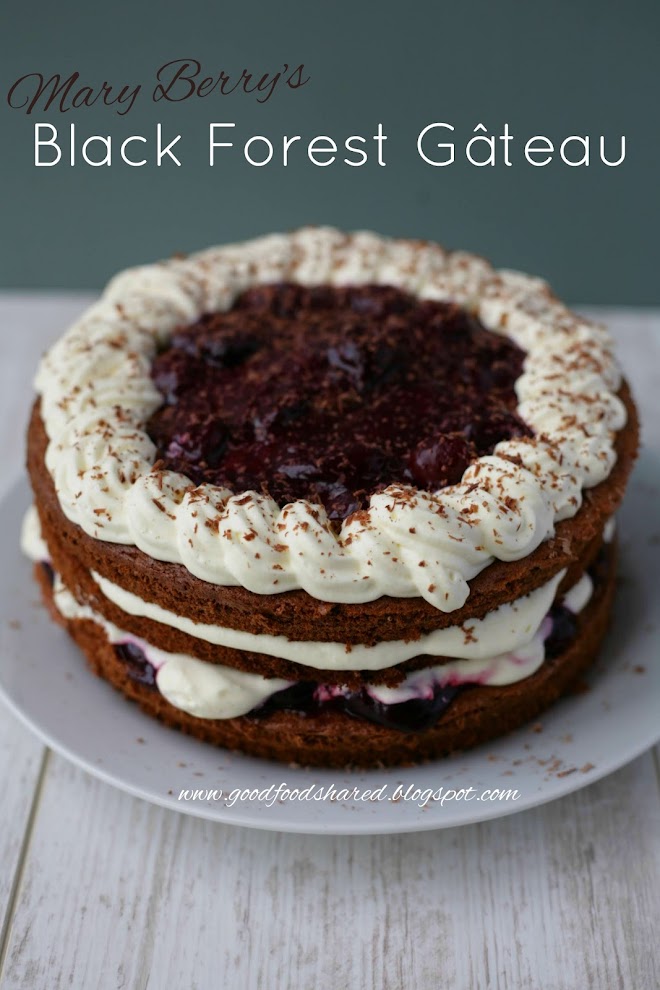
You can choose to leave the sponge cakes exactly as they are or if you're feeling adventuress, split the sponges horizontally using a long bladed bread knife, working carefully turning the sponge in a clockwise motion as you cut into the centre of the cake. Once both sponges are split, you can start assembling the cake, lay the first layer of sponge onto your serving plate, add a quarter of the cherry filling onto the sponge and spread it outwards with the back of a spoon, top with roughly a quarter of the cream and spread outwards also. Add the second sponge layer and repeat until all four layers are complete. The top of the cake can be piped with whipped cream and a star nozzle (I used a Wilton 1D) then add the last of the cherry filling to the centre, however it will taste just a good if you dollop on the cream around the edges with a teaspoon, you know rustic like. Grate the dark chocolate over the entire cake and serve immediately.
A treat for the eyes and the awaiting audience.

Do you add the corn flour to the sponge mix
ReplyDeleteAs mentioned in the recipe the cornflour is added to the cherries. Many thanks for your interest.
Delete